Roof extension
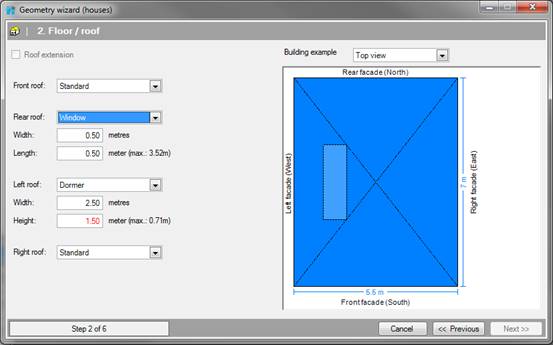
In step 2 you define window openings and dormers in the roof
When the flat Roof type is selected, there is the option
to place a construction on top of the building. Ticking this box enables these
options to be entered
[Left/Centre/Right]
This is the
horizontal alignment of the extension in the x-axis, parallel to the front
façade of the building.
[Front/Centre/Rear]
This is the horizontal
alignment of the build-up in the y-axis, parallel to the side wall of the
building.
[metres]
This is the length, or
depth (along the Y-axis) of the extension in metres. This size determines the
length of the side walls of the roof.
[metres]
This is the width (along
the X-axis) of the extension in metres. This size determines the length of the
front and rear of the roof.
[metres]
This is the height (along
the Z-axis) of the extension in metres. This size determines the height of the
roof.
Roof
There are four roof surfaces, each parallel to one of the wall surfaces. Depending on the selected type of roof you can place windows and dormers into the surfaces.
•Standard; the roof will remain a closed roof surface, that is to say without gaps.
•Dormer; a dormer window is placed, wherein the vertical walls of the dormer, and the roof of the dormer window placed horizontally attached to the roof surface The width and height of the dormer structure are specified in this section
•Window; A skylight is placed in the roof surface.
[metres]
This is the width of the
dormer, or roof in metres. The width is limited by the width of the roof surface
in which it is located.
[metres]
This is the height of the
window dormer, in metres, measured from the bottom of the dormer up to the ridge
of the dormer.
[metres]
This is the length of the
skylight in metres.
|
|
The dormer window is always placed in the middle of the roof surface. You can move the skylight after completing the wizard using the Move tool in the drawing tools menu.
|
|
|
When an entry is red, the input values are not geometrically consistent. For example, the width of a roof window may not be more than the width of the roof surface. If the input value is not valid, you will not be able to proceed to the next step of the wizard.
|
•You can exit the wizard at any time by clicking. Cancel. The Wizard will then be closed, and any data entered into it will be lost.
•You can change data in a previous step by clicking Previous
•If the above information is entered correctly, go to Step 3 of 6; Facade extension (front and rear) by clicking on next.

